Latest Event Updates
Super Awesome Seed Vault Giveaway
Image Posted on Updated on

How awesome is this Survival Seed Vault?! Its a garden in a a can! Want to win it and be a Super Awesome gardener this Spring? THREE awesome winners will be announced February 18th! Good Luck!
Follow These Three Easy Steps to Enter
1. Subscribe to The Toups Address Newsletter by entering your email below.
You are free to unsubscribe at any time after this giveaway has ended. I will not share your email address with a third party. Your email address is solely used for The Toups Address (currently sent out once a month) and general/sporadic updates.
(If you’re already a subscriber, just continue to step 2. You will confirm you subscription in the rafflecopter widget below.)
2. Click here to check out the Survival Seed Vault and leave a blog comment letting me know which of the 20 seed varieties YOU would be most excited to grow!
3. Head on down to the Rafflecopter entry page to enter! http://www.rafflecopter.com/rafl/share-code/MmUxNDEyZmQ0NzYxZWE5OTI4NGJlMjg2Y2I5NDkyOjEx/.
Be sure to visit the other blogs co-hosting this giveaway!
Five Little Homesteaders
Blue Yurt Farms
The Browning Homestead at Red Fox Farm
Faulk Farmstead
This Original Organic Life
Earthworms and Marmalade
RiddleLove
Homestead Honey
The Jahner Farmstead
Learning and Yearning
Green Eggs and Goats
The Farmstead
Little Homestead on the Range
The Randazzo’s
A winner will be chosen via random.org. This giveaway ends at 12:00 AM on Tuesday, February 18th, 2014. The winner will be contacted by email, and will have 48 hours to respond with his/her full name, address, and phone number. There is no purchase necessary to win. This giveaway is open to US and Canadian residents!
Good Luck!
Homemade Sweet Cream Butter
Image Posted on

So I did it! I made my very own homemade butter.
Big accomplishment for me! I know it’s not super hard, but it’s something I have BEEN wanting to do.
Here’s how I did it….

Homemade creamy delicious BUTTER:
I started off with a quart of raw cream that I skimmed from about 3-4 gallons of milk. I always leave an inch or two on the gallon for good creamy flavor. Make sure your cream is at least 1-2 days old and not fresh from the cow, it will cream up better that way. Also, to make it cultured, like most butter is, leave your cream on the counter at room temp for about 8 hours. If using store bought cream, organic low-temperature pasteurized is ideal. Ultra-pasteurized is what you don’t want.

This is Parsley….cute name except it is because she ATE all my parsley! She wanted her 15 min of fame while I was making making up some butter.

Pour all your cream in a high powered blender…I used my Vitamix, but any high powered blender or even your KitchenAid mixer would do. I would probably be using my KitchenAid too, that is if I had one. Blend for about 5-6 minutes on medium.

If it looks like this ^^ Then it’s not quite done yet. It will go from cream to whipped cream to chunky whipped cream to butter.
Once its all chunky and yellow on top, pour all contents into a bowl and salt to taste.. Pick out the butter pieces and form a ball while squeezing all the extra buttermilk out. If you leave buttermilk in the butter, it can spoil much faster. While running under really cold water, or continually dipping in ice water, squeeze as much of the liquid (buttermilk) out as possible. You can now use your butter, refrigerate or freeze it for later! I wrap mine up in wax paper, secure with some tape and label it! And make sure you hang on to that buttermilk, its a superfood too!

February’s Instagram Challange!
Image Posted on

#mysweet2014
Are you on Instagram? I am! Everyday….well yea pretty much everyday. I love getting to see all your pictures throughout the day when I have some downtime…..downtime? Whats that? Anyways. Join me on this super cute and fun Instagram Challenge!
It starts today and myself along with some other bloggers are getting together to share our favorite pictures. Meet up with us on Instagram and have fun too! Participation is easy: every day throughout the week you’ll post a picture on Instagram using the themes below. The first day do #1, the second #2, and so on. Be creative with it and don’t worry about posting the “right” or “wrong” things– it’s all just for fun!
Just make sure that you tag #mysweet2014 and your hosts: @thetoupsaddress @melfaulk, @grownandhealthy and @lilhomesteader so we can all see what you post!
Here are the Themes!

Recipe: Banana Nut Bread for a chilly day.
Image Posted on Updated on

So it is in the 20’s down here in South Alabama, and we have had freezing rain/sleet/snow mix for the past two days. Which means the roads are closed and Daddy gets to stay home from work! We have been cooking up lots of delicious things and watching our chickens get really upset at this “white stuff” on the ground!
My two sweet babies got to experience snow for the 1st time in their life! It wasn’t much but it was ALOT for us on the Gulf Coast!

One of my favorite go to recipes for when it’s cold out and we want a warm satisfying snack to fill our bellies or to go along with some hot chocolate or creamy coffee is this delicious banana nut bread recipe 🙂
Banana Nut Bread:
4 really ripe bananas
1/2 cup raw milk
6 tablespoons of melted butter
1/4 cup rapadura or honey
1egg
1 tsp vanilla
1 3/4 cup of sprouted flour
1 tsp baking soda
1 tsp baking powder
1/2 tsp sea salt
1 tbs cinnamon
1 1/2 cup of chopped pecans
Preheat oven to 350 degrees. Mix all dry ingredients in a large mixing bowl. In a separate bowl, mash bananas with a fork until soft and mushy, add all other wet ingredients and stir well. Pour into dry ingredients and mix until combined. Transfer mixture into well buttered and floured loaf pan. Bake for about 1 hour or until toothpick comes clean. Serve warm with butter, yumm!!!
Help me Spring Garden. Let’s Compare!
Image Posted on Updated on

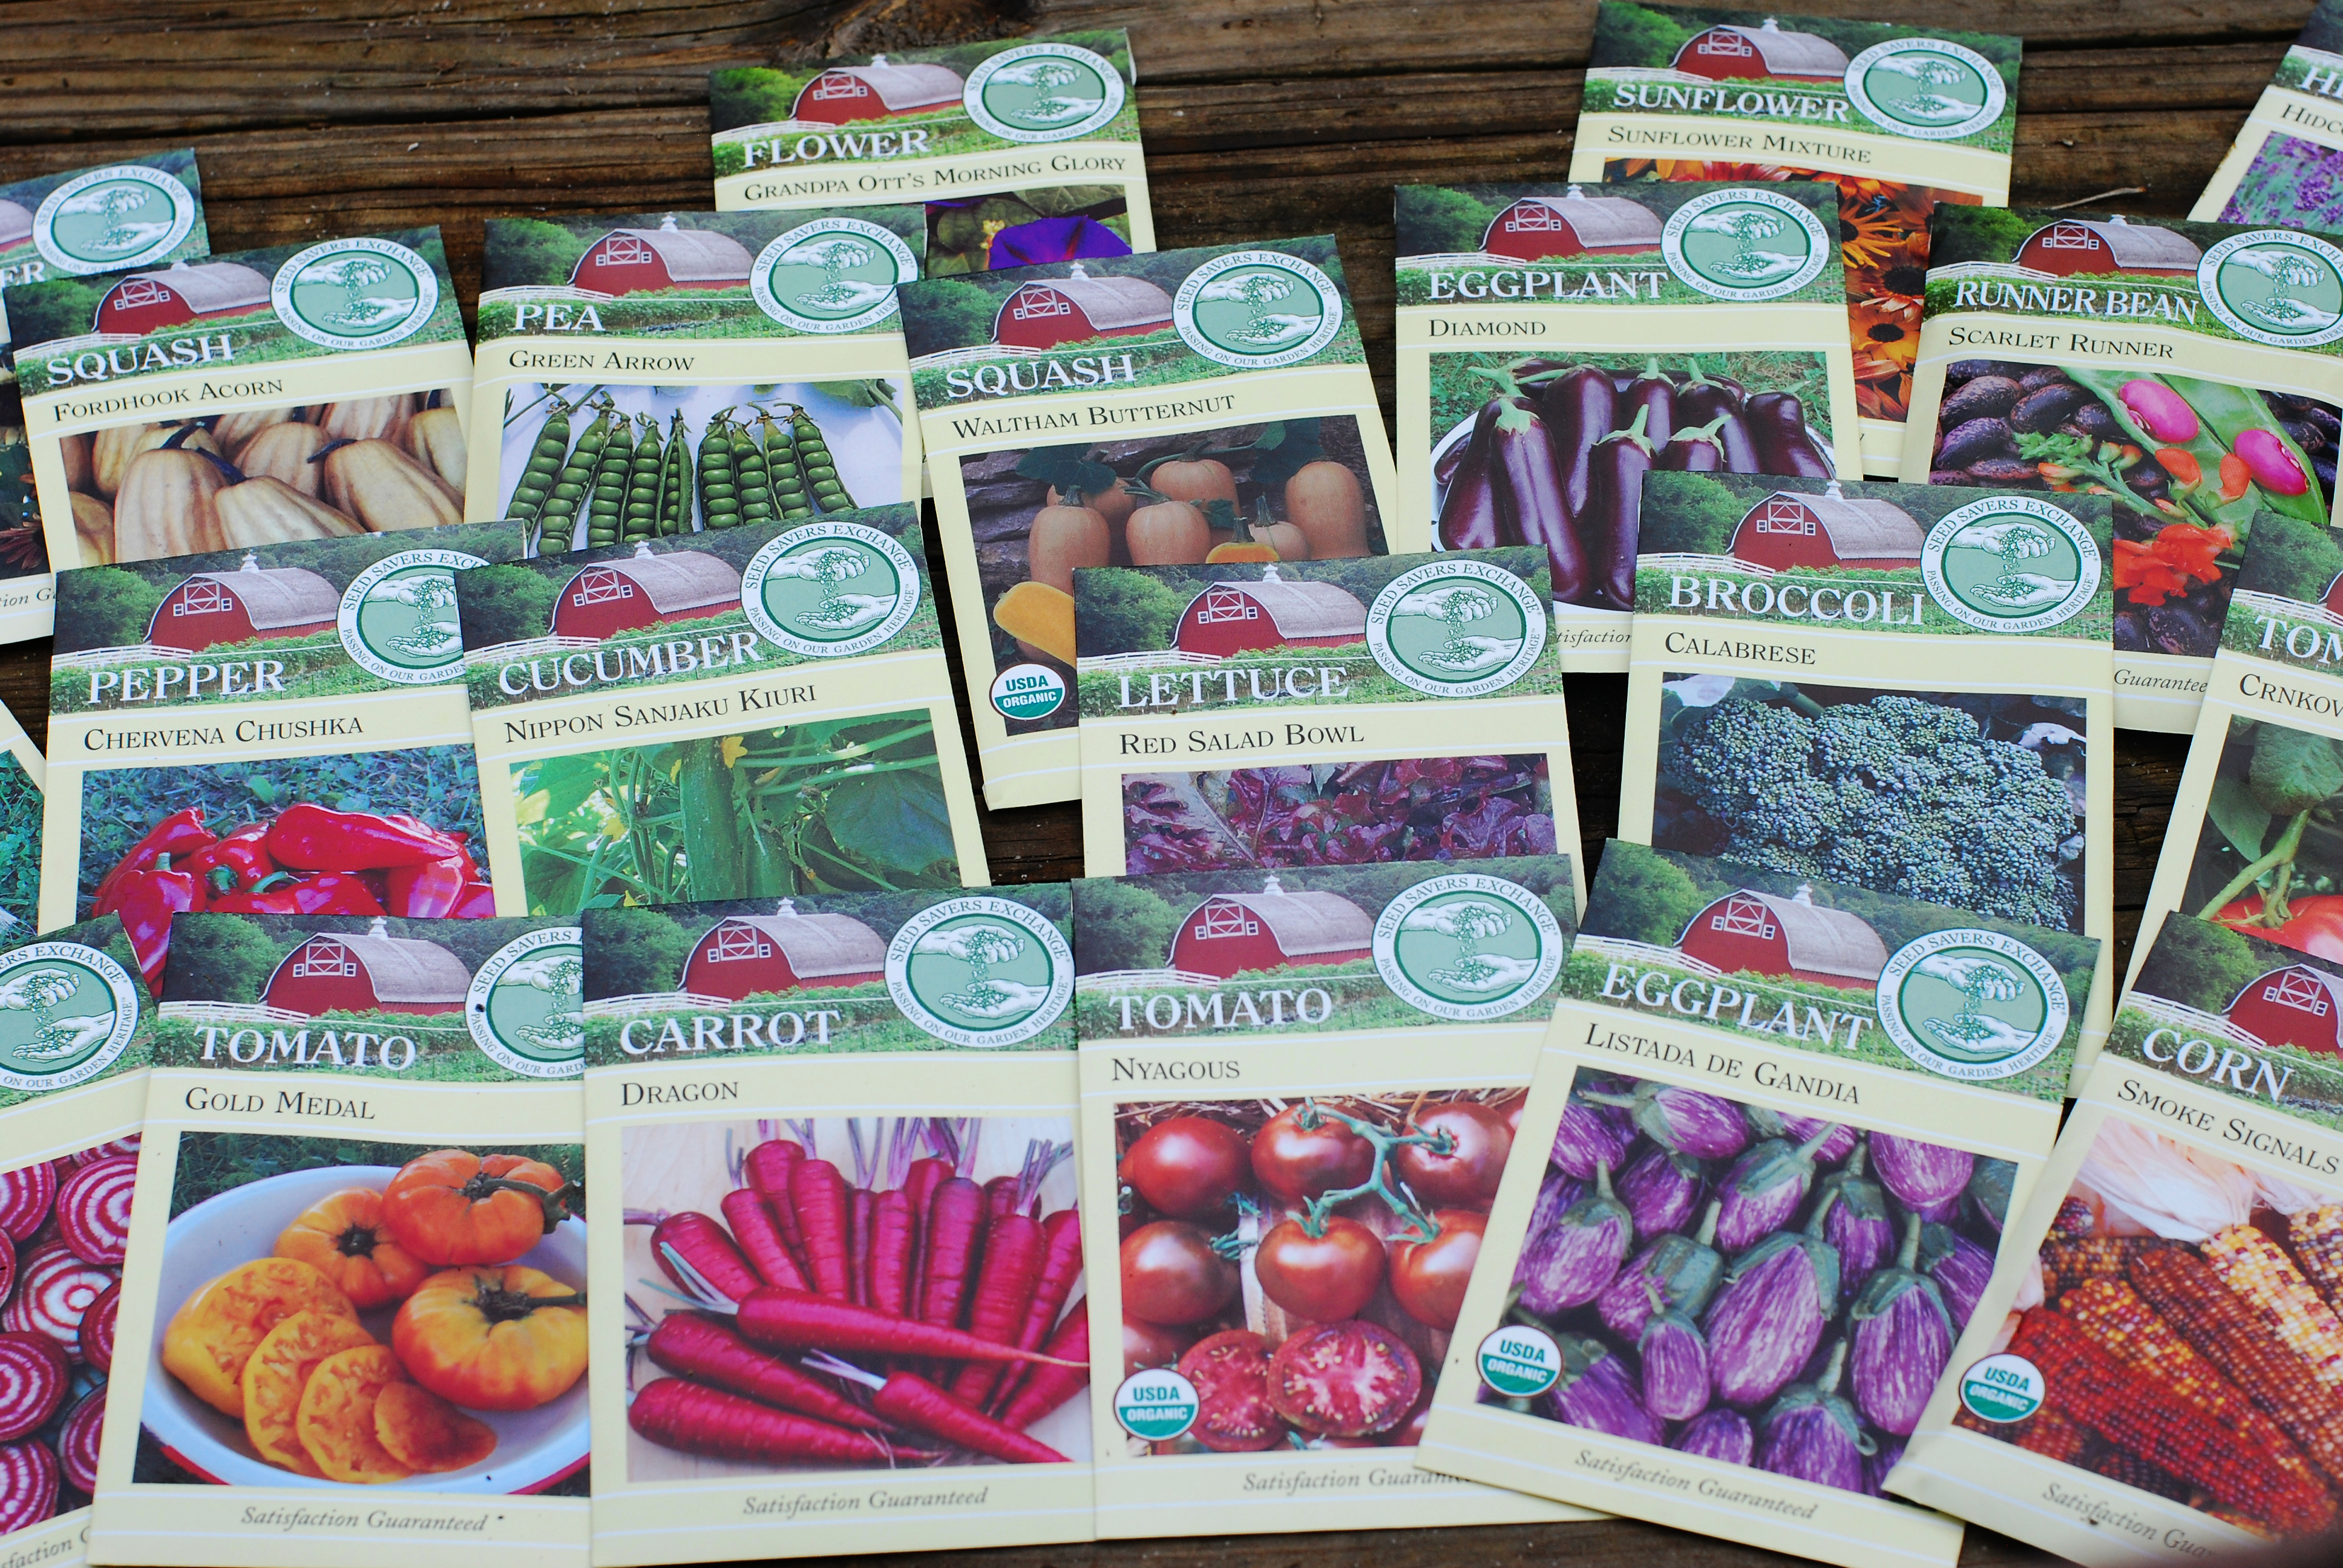
So I have been pouring over the seed catalogs and have ordered everything I want to plant for Spring!
Have you ordered for Spring? Are you about to? I want to know. This is my FIRST garden!! Except for my herbs, I have never had my very own vegetable garden. Are you excited? I know I am!
SO LETS COMPARE GARDENS….
Here’s the deal. Are you planting anything that I am? Read over the list of seeds I have ordered and compare! Found a match? (It doesn’t have to be from the exact same seed company, just the same version (ex:Emerald Delight Zucchini) Let me know! Email or message me via Facebook.
All Spring and Summer long I will be doing weekly updates on my garden, from starting seeds to harvesting, complete with pictures and descriptions. I want to compare your garden to mine. Let’s see what we have done differently and what has worked best. Also, we can get help with problems, like squash bugs, and hear from each other on how each problem was solved.
Here is what I am planting! I ordered all my seeds from Seed Savers Exchange this year, and a few (noted on list) from Botanical Interests.
- Bean Bush, Tavera (Botanical Interests)
- Bean Runner Bean, Scarlet
- Beet, Chioggia OG
- Broccoli, Calabrese
- Carrot, Dragon
- Carrot, St. Valery
- Corn, Smoke Signals OG
- Corn, Sugarbaby (Botanical Interests)
- Cucumber, Armenian Burpless (Botanical Interests)
- Cucumber, Nippon Sanjaku Kiuri OG
- Eggplant, Diamond OG
- Eggplant, Listada de Gandia OG
- Flower, Black Velvet Nasturtium
- Flower, Diablo Cosmos
- Flower, Grandpa Ott’s
- Flower, Johnny Jump-Up
- Flower, Sea Shells Cosmos Mixture OG
- Flower Sunflower, Arikara OG
- Flower Sunflower, Evening Sun OG
- Flower Sunflower, Sunflower Mixture
- Herb, Lavender Hidcote Blue
- Flower, Sweet Pea Grandiflora Mixture
- Lettuce, Red Salad Bowl
- Pea, Green Arrow OG
- Pea Snap, Cascadia (Botanical Interests)
- Pepper, Chervena Chushka OG
- Squash, Emerald Delight Zucchini (Botanical Interests)
- Squash, Fordhook Acorn OG
- Squash, Waltham Butternut OG
- Shallot, Zebrune
- Tomato, Black Krim
- Tomato, Nyagous OG
- Tomato, Gold Medal
- Tomato, Crnkovic Yugoslavian
Now let me know what your planting!!
Oatmeal…the best oatmeal you will ever eat.
Image Posted on Updated on
Oatmeal…..the best dang oatmeal you will ever eat.

Do you like oatmeal?
Do you eat that nutritionally void prepackaged instant stuff?
Maybe you’re like my sister and don’t even like oatmeal?
Well after you whip up a batch of this totally delicious and creamy goodness, you will NEVER. LOOK. BACK.
I mean back to your instant or non-loving oatmeal days. Yea you will even dream about this oatmeal. Ok, well maybe you won’t. But I do. Did I just admit that out loud?
BEST OATMEAL EVER
1.5 cups of organic rolled oats
1.5 cups of whole raw milk
1cup water
2 tbs of butter
¼ teaspoon of sea salt
handful of chopped pecans
Banana
Heat milk plus 1 cup of water in saucepan over medium heat until it come to a simmer. (Be careful not to boil as it could curdle the milk). Add the oatmeal and sea salt, bring to a boil, then lower the heat, add butter and simmer for about 5 minutes, stirring until thickened.
Top this off with a maple syrup, sliced bananas, pecans and if you are like me, a little sprinkle of more sea salt and some flax seeds. Now enjoy a little heaven in a bowl.
It is truly delicious.
Stress Away Bath Melts
Image Posted on Updated on

Love the Lush bath melts? Me too
Love the price? I didn’t think so.
Here is my recipe for some rockin bath melts that I totally love and for a whole lot less out of your wallet.
Now who wouldn’t like that?!
This Choco-lavender scent will take you to another place. It’s that heavenly.

Stress Away Bath Melts
1/2 cup cocoa butter
1/2 cup shea butter
4-5 drops Lavender essential oil

In a double boiler melt both cocoa butter and shea butter together. Add lavender oil and set aside.

Sprinkle lavender and calendula flowers at the bottom of your mold and pour melted mixture on top. Give a little shake to get the bubbles out and place in the fridge until set. 20-30 min. Pop out your molds and store in an airtight container until ready to use.
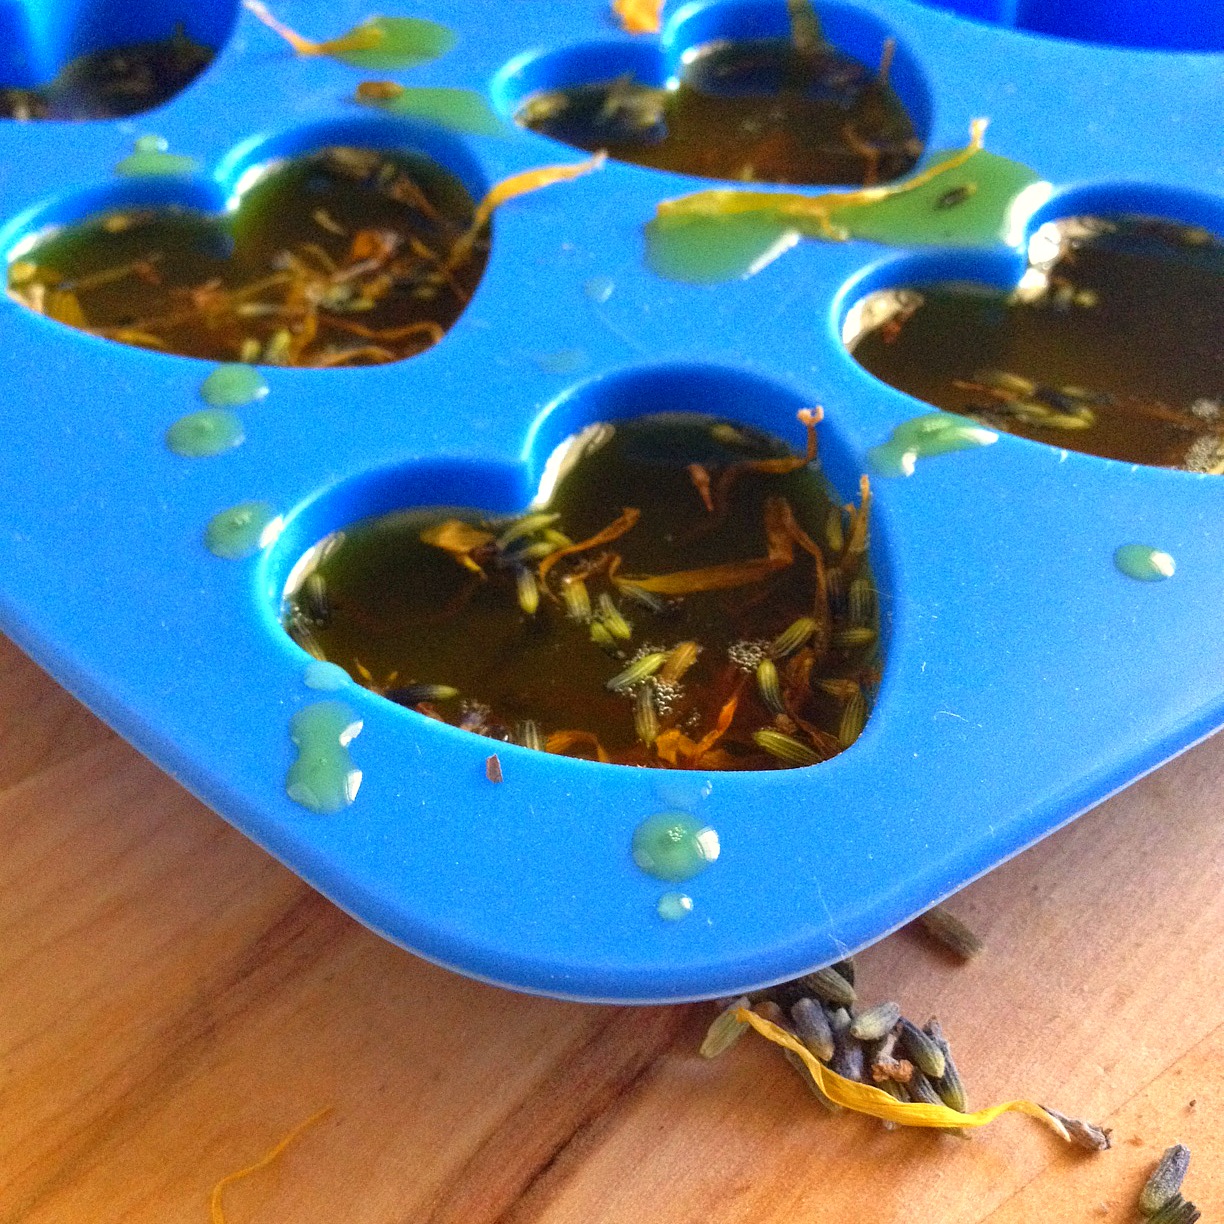
If you want some instant gratification, wipe you hand aroud the inside of the bowl to gets whats left of the melted mixture….smooth all over hands and feet. Mmmmm

No time to make them, or don’t want to? NO PROBLEM! These can be found on my etsy site 🙂
Etsy site name: ToupsAddress
Diary of a GAPS Mom: Day 1 of Intro (Stage 1)

Ok, so we did it. We started GAPS Intro.
Need I say more? Just kidding.
If you know anything about Dr. Natasha Cambell-McBride (Dr.NCM) and Gaps protocols, you know it aint easy. Especially in this good food loving southern home. But……my dear Elise at 2 years old, suffers with painful eczema, bad mood swings and food intolerances to some dairy and most preservative chemicals, and sensory issues with food. I will go on to say I was a lot more uneducated during her pregnancy and infant hood, and at 6 months old, introduced formula! I was working full time and stressed. Needless to say, my supply dropped and I wasn’t nursing/pumping enough. Formula did not agree with her (of course!) and we then switched to SOY formula. (There I said it….rather wrote it OUT. LOUD.) Yes, soy. It still saddens me to this day that I did not properly educate myself of the dangers and just plain bad things about soy (GMO’s anyone?). I cringe now when i hear of people feeding their infants soy formula. We believe this has a lot to do with why we need GAPS. So here we are. Intro.
I will preface this by saying, this is not our first time on starting Intro. About 4-5 months ago we attempted to start GAPS, and we did not succeed. We definitely failed. I gave in. I caved. I gave her what she wanted because it was hard. But that isn’t love is it? We are much better prepared this go ’round. We WILL succeed.
BREAKFAST:
1/4 cup of kefir diluted with some water. (Easier for her to drink) I added about a 1/4 teaspoon of honey to get her to drink it.
Carrots and zucchini boiled in broth.
-She drank the kefir, but did not touch the vegetables.
LUNCH:
Same boiled veg reheated in a skillet.
1 cup of broth to drink.
-Drank a few sips of broth and ate maybe 5-6 carrot coins.
DINNER:
chicken – few pieces cut up
delicata squash
-She mostly played with it and then refused. Should I say….spit out the chicken.
Ok, so Note to Self: HIDE ALL NON-GAPS FOOD! She cried all day for a banana. At supper, she of course wanted what Daddy and I had. (Chicken, squash and quinoa) Wouldn’t you know, all she wanted was the quinoa that she CANT have! She got a few bites of that and TOMORROW we will do better. Both my husband and I agree that we will not have anything at supper that she cannot also have.
Also, I did not get as much broth in her as I would have liked, so that is a goal for tomorrow.
BEDTIME: another bottle of 1/4cup kefir and water with about a 1/4 teaspoon of honey.
Your constructive criticism is encouraged.
Homemade Tamales
Image Posted on

Passing by that Mexican restaurant close to my house has me craving some serious Mexican food…
And I LOVE tamales! But most times when I order them, they come out bland and leave me disappointed.
These my friend, will not disappoint! They are marvelous I tell you.
Even my 2-year-old mopped up her plate.
Shall I go on…?
Homemade Tamales Filling: – 1 lb of grass-fed beef or pastured pork – 1 large onion – 1 large bell pepper – 2 cloves garlic chopped – 2 tablespoons smoked paprika – 1/2 – 1 teaspoon crushed red pepper (depending on how spicy you like it)– 2 teaspoons sea salt
– 1/2 teaspoon coriander
– 1/2 teaspoon cumin
– 1/2 teaspoon fresh ground black pepper – 1/2 cup water Masa Dough: – 2 cups organic masa harina – 1.5 cups of homemade chicken or beef broth – 1 teaspoon baking powder – 1/2 teaspoon sea salt – 2/3 cup lard or tallow (I have also used olive oil in the place of) 1 (8 ounce) package dried corn husks
Blend both onion then bell pepper in mini food processor, or chop finely by hand

Cook down in a skillet for 5 min or so.

Add meat and spices and garlic cook until all cooked through, about 15 minutes. Add water and stir. Simmer with lid on for 15 more minutes.
Next take a few of your corn husks and soak them in a bowl of warm water.

This makes them pliable and easy to fill.
In a large bowl, blend the lard with a tablespoon of the broth until fluffy. Combine the masa harina, baking powder and salt; stir into the lard mixture, adding more broth as necessary to form a spongy dough.
Fill your corn husks with a large spoon of dough, spreading to about 1/4 in thickness. Spoon in 1-2 tablespoons of meat mixture in the middle.

Now here’s the trick…..fold each side towards the center till the masa touches and then fold the bottom part up. You may need to use town pieces of the husks to tie it together, though it isn’t necessary.

Continue until you are out of ingredients.

Steam in pot for 1 hour!

Top with cheese or refried beans or salsa……or just enjoy them plain! They are delicious!
10 Healthy Toddler snacks for the busy mom
Video Posted on Updated on
Ok, so throw away that sucker and chunk that bag of gummies.
Lets stop loading up our kids on toxic High Fructose Corn Syrup and food colorings (like yellow#5 and red#40). Did you know gummy candies are also a source of Gelatin… most candy is made from gelatin rendered from factory farm animals (toxic, sick animals). Wisegeek.com points out “A rendering plant is a processing operation where dead animals are recycled into products from human food to biodiesel. The remains and waste from slaughterhouses are the primary contributors to these facilities. Heads, hooves, bones, blood, offal (internal organs) and anything else that cannot be used ends up at a rendering plant.
“Carcasses of dead animals from livestock and confinement operations are the secondary contributors. A rendering plant will also take dead horses, llamas and other farm and zoo animals. Remains of dogs and cats, roadkill (deer, skunks, rats and raccoons) end up there as well. Veterinary clinics and animal shelters also rely on rendering plants for their euthanized animals. They also accept throwback or rejected meat from supermarkets.”
There is higher quality gelatin made from pasture/ grass fed animals. This is good for our bodies and traditionally stocks was made by boiling the bones of whatever meat was available to a family. It’s rich in nutrients and good for your gut.
SUGAR – a great explanation about why too much sugar is bad for us, is shown here in this video by Sean from Underground Wellness
So….what SHOULD we feed our kids?
1. FRESH FRUIT – I like to take easy things like grapes and blueberries on the go. I peel up some apples and stick them with some chopped pineapple to keep them from turning brown!
2. POPCORN – Though we know that 90% of the corn grown and eaten in this country is GMO corn, popcorn comes from a different seed and has not been genetically modified. You still want to steer clear of microwave popcorn. Take the time to pop your own and toss on some real butter and sea salt. Even better, melt down some rapadura and a little organic whole milk and drizzle on for caramel popcorn!
3. HOMEMADE GUMMIES – Gummies…….did I just say gummies??!! Yes, my daughter loves these homemade HFCS free gummies made with a healthy gelatin source. I started with this recipe from Mommypotamus for gummy stars and changed it up using different fresh made juices and rapadura instead of honey. These literally take like 10 min to make!!! I keep some in the fridge at all times 🙂
4. HOMEMADE BEEF JERKY – Make beef jerky from leftover roasts
leftover roast pieces
honey or maple syrup
garlic, crushed
black pepper
apple cider vinegar to make wet marinade
olive oil
smoked paprika
cayenne
ginger
sea salt all to taste
Cover beef pieces in a ziplock bag with all ingredients. Place in refrigerator overnight.
Place them on a tray in the oven on 155 F for 7 hours or on 200F with a towel keeping the oven cracked open a little. You can also put these on dehydrator trays and set it on high at 155 for 7 hours.
Delicious and nutritious snack!
5. RAW CHEESE – Organic Valley is putting out some raw milk cheeses, I’ve seen these recently in Winn-Dixie. Cube these up and serve with a few pieces of carrots julienned.
6. KALE CHIPS – Tear up your kale and LIGHTLY coat with some olive oil. Sprinkle on some sea salt and seasoning of your choice. Bake them at 305F for 10 min. Flip them half way through if needed. They will stay crispy in a ziplock bag. YUMM!
7. EGGS – hard boil a few eggs or make deviled eggs. Cut in 1/2 or 1/4 for your toddler.
8. HOMEMADE POPSICLES – They may not be good “on-the-go” snacks make a delicious treats. Mix up any smoothie in the blender with fruit, honey and milk or Kefir and pour into molds. Or try this recipe from The Nourishing Gourmet for Homemade Creamy Tropical Popsicles.
9. SMOOTHIES – You can sneak tons of good things into a smoothie! I always start with a sweet fruit like mango, blueberries or bananas and add whole organic milk or homemade kefir and ice. If its not sweet enough I add local raw honey or Rapadura. Because we get fresh yard eggs from a source I trust, I add a raw egg yolk here and there. Sneak some green leafy veggies in there too. They will never know 🙂
*Raw egg facts: The sulphur amino acids help to keep you young, raw eggs also contain an abundance of other vital substances including protein, essential fatty acids along with niacin, riboflavin, biotin, choline, vitamins A, D and E, magnesium, potassium, phosphorous, manganese, iron, iodine, copper, zinc and sulphur. Egg yolks are one of the few foods that contain vitamin D. Source: Regenerative Nutrition and Mommypotamus
10. ORGANIC FREEZE DRIED FRUITS AND VEGGIES – these are easy to tote and perfect for on the go! Try the Just Tomatoes Brand.
Any healthy snacks that you like to make in your home? Leave your suggestions in the comment section and let me know!
